Virtual Controller
Android application
For the platform to run the virtual controller on we chose Android. It was develped using Scala programming language. Scala is modern, staticially typed, multi-paradigm language. It mixes object-oriented paradigm with funcional paradigm. This allows programs written in Scala to be very concise. Another interesting property of Scala is that it is fully interoperable with Java, and Scala source code is intended to be compiled to Java bytecode. As a result of this we can develop apps in Scala for the Dalvik VM. There is a great sample application with detailed instruction how to start developing apps for Android in Scala using IntelliJ IDEA. Source and installer of the application is available on GitHub. Minimal required version of Android is 2.3.3 (Gingerbread).
User Interface
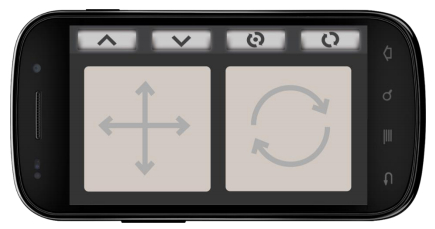
The UI offers an easy and intuitive way of driving the robot. It consists of two surfaces and four buttons. The left surface enables the user to command the robot to translate in any direction. Right surface is used to rotate the robot.
The buttons allow some special movement pattern. They are described from left to right:
- rising the body
- lowering the body
- toogle the tilt mode - mode in which the robot mirrors the tilt of the smartphone
- toogle rotational and translational mode - it allows the robot to translate and rotates the body in the same time. During this mode the robot can’t walk.
The GUI of the application was designed by student Sara Pavleković Preis from Faculty of Architecture - School of Design.
Driving
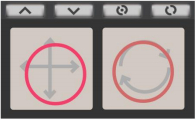
Driving the robot is really easy. It was largely inspired by the way popular gamepads are used to play video games. The user is driving the robot with his thumbs, using his left thumb to translate and his left thumb to rotate the robot. When the thumb is pressed down on the surface a circle is drawn around the finger. This circle represents the area of sensitivity of the surface. Further away the thumb is from the centre of the circle, the faster the robot moves. When the finger crosses over the edge of the circle, top speed is reached.
Connecting to the pa00k
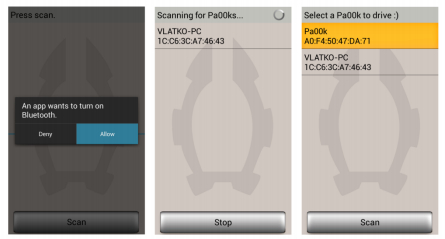
When the app starts it will demad that Bluetooth must be turned on. Allowing this, we land on a screen from which we can choose a bluetooth device to connect to. Selecting the pa00k the app prompts us with the driving interface described above.
Bluetooth communication
Communication between the Android device and the robot is one way. Every 100 ms a packet is sent to the robot containig the current state of the UI. The Bluetooth connection to the robot is serial, so we created a simple way to synchronize the packets. We begin each packet with character ‘P’ and the rest of the cells represent:
- x1, y1, x2, y2 - thumbs’ coordinates on the control surface (range [-100..100]
- hight of the body [1..3]
- level of stride [1..3]
- tilt and rot/trans mode toogle [0,1]
- acceleration of the phone in x and y axis, required for the tilting
